Field Article // Survival Skills
Building a Log Cabin Shelter from Massive Logs: Traditional Bushcraft Guide
Learn how to build a warm log cabin shelter from massive logs using traditional bushcraft skills, including log notching, stone stove construction, chinking, an
Introduction
Imagine spending a night deep in the forest, temperatures dropping well below freezing, with nothing between you and the elements but a structure you built with your own hands from the trees around you. That is exactly what this video demonstrates. A seasoned outdoorsman constructs a complete log cabin shelter from massive felled timber using only hand tools and traditional bushcraft techniques that have sustained wilderness dwellers for centuries. From selecting and felling the right trees to notching, stacking, chinking, and weatherproofing every wall, every step is shown in real wilderness conditions with no shortcuts and no modern machinery.
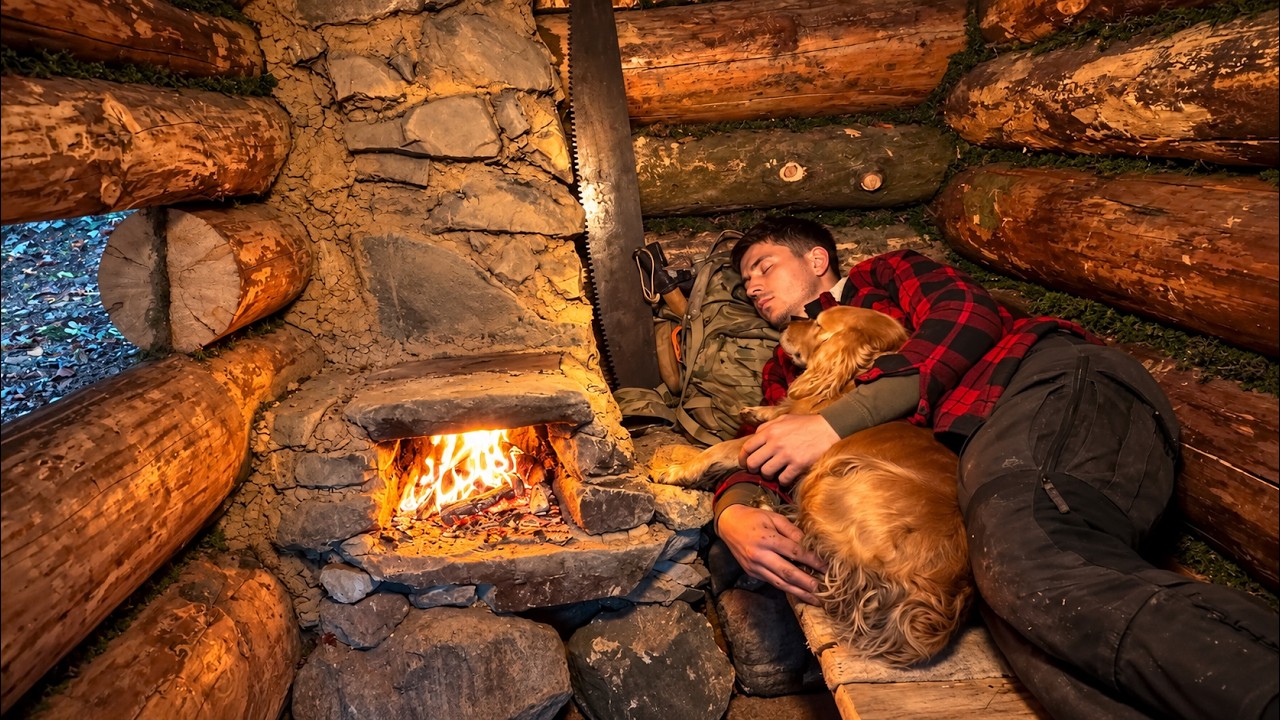
The builder works alongside his dog, a reminder that companionship and practical support in the wilderness go hand in hand. Beyond the cabin walls, he constructs a functional stone stove from gathered rocks for heating and cooking, builds a raised sleeping platform to insulate against the cold ground, and spends a full night inside to prove the shelter performs under real conditions. The result is a sturdy, insulated cabin that retains heat, blocks wind, and provides genuine long-term protection in the wild.
What sets this build apart from typical bushcraft shelter videos is the level of detail and the willingness to test the finished product overnight. Many tutorials stop at the build phase, but this one follows through with a real overnight stay in freezing conditions. The builder wakes up warm and rested, proving that these traditional methods work exactly as they have for generations. Whether you are a weekend bushcrafter honing your skills or planning an extended wilderness stay, the methods shown here form a complete blueprint for building a reliable forest shelter you can trust with your life.
Choosing Your Build Site
Before felling a single tree, the builder assesses the surrounding forest for the right combination of materials and terrain. A good shelter site needs level ground, proximity to standing timber of the right size and species, and natural drainage that keeps water away from the structure. The builder also considers wind direction, positioning the cabin entrance to minimize exposure to prevailing winds and maximize natural warmth from sunlight.
This stage is often overlooked by beginners, but it is critical. A poorly chosen site can undermine even the best-built shelter. Take time to read the landscape before committing to a location. Look for signs of seasonal water flow, check the prevailing wind patterns by observing tree growth patterns, and ensure there are enough suitable trees within a short dragging distance to minimize the energy spent transporting logs.
Step-by-Step: Building the Log Cabin
Selecting and Felling Timber
The construction process begins with choosing the right trees. Straight, thick logs with minimal taper form the backbone of the cabin walls, providing both structural integrity and natural insulation. The builder identifies trees that are tall enough to span the wall length in a single course, reducing the number of joints and weak points. Dead standing timber is preferred in some traditions because it has already dried and is lighter to work with, though green timber can be used if debarked promptly.
Each tree is felled using a hand axe, a method that requires patience and precision but leaves you completely self-reliant in the forest. Once the logs are down, they are debarked to reduce moisture retention and insect activity, then cut to the required length for each wall course. Debarking is an essential step that extends the life of the cabin by preventing rot and making the logs less attractive to burrowing insects.
Notching and Stacking the Walls
The walls go up one log at a time, with each log notched at the joints where it meets the perpendicular log. The builder uses a saddle-notching technique that carves concave cuts into the underside of each log so it seats snugly onto the log below. This interlocking method locks the walls together securely and prevents the structure from shifting under its own weight or in high winds.
As the walls rise, the builder checks for level and adjusts the notching depth to keep each course consistent. Precision at this stage pays dividends later when it comes time to chink the gaps. A well-notched cabin requires less chinking material and creates a tighter, more weatherproof seal from the start.
Chinking for Weatherproofing
Gaps between the logs are filled with natural materials like moss, mud, and clay through a process called chinking. This is the step that transforms a stack of timber into a weatherproof, wind-resistant shelter. The builder packs the mixture tightly into every gap, inside and out, creating a seal that blocks cold drafts and retains interior heat.
Proper chinking is what separates a cabin that holds warmth through the night from one that bleeds heat through every crack. Never skip this step, and revisit it after the first few nights as materials settle and new gaps appear. A mixture of clay and moss works particularly well because the moss provides fiber that holds the clay in place while the clay creates an airtight seal.
The Stone Stove: Heating and Cooking Off-Grid
One of the most impressive elements of this build is the stone stove, constructed entirely from rocks gathered in the surrounding forest. The builder carefully selects and stacks stones to create a fire chamber with a natural draft that draws smoke out while radiating heat inward into the cabin. The stove serves double duty: it warms the interior during the overnight stay and provides a flat cooking surface for preparing food.
No metal, no modern components, just thermal mass and intelligent design working together to keep the space livable. The builder also demonstrates how to manage the fire safely inside an enclosed log structure, a skill that requires careful attention to ventilation, fire placement, and maintaining clearance from the wooden walls to prevent ignition.
The thermal mass of the stone continues radiating heat long after the fire dies down, which is why a well-built stone stove can keep a small cabin comfortable through a full cold night with minimal fuel. This principle of thermal mass heating is one of the most valuable lessons in wilderness shelter construction, and it applies whether you are building a permanent cabin or a temporary survival shelter.
The Raised Sleeping Platform
The builder constructs a raised sleeping platform from logs, creating a bed frame that lifts the sleeping surface off the cold ground. This is one of the most important survival principles demonstrated in the video. Sleeping directly on the earth draws heat away from your body through conduction, which can lead to hypothermia even in a shelter that otherwise blocks wind and rain.
By elevating the platform and layering it with natural insulation material like pine boughs or dry leaves, the builder creates a sleeping surface that retains body heat and provides genuine comfort in a wilderness setting. The raised platform also keeps you off damp or wet ground, which is critical even inside a shelter where moisture can seep through the floor over time.
Key Survival Takeaways
- Log Selection and Felling: Choose straight, thick logs with minimal taper for wall courses. Identifying and harvesting the right timber is the foundation of any durable shelter build.
- Saddle Notching: Proper notching at each log joint locks the walls together and prevents gaps that let wind and rain through. This interlocking method is what separates a weatherproof cabin from a drafty pile of logs.
- Chinking for Weatherproofing: Filling gaps between logs with moss, mud, or clay blocks drafts and dramatically improves the cabin’s ability to retain heat. Never skip this step.
- Stone Stove Construction: A stove built from gathered stones provides heat and a cooking surface without modern equipment. Strategic stone placement and natural draft design maximize heat output while channeling smoke safely outside.
- Elevated Sleeping Platform: Raising your bed off the ground on a log frame insulates your body from cold earth and prevents heat loss through conduction. This is essential for preventing hypothermia during overnight stays.
- Overnight Testing: Spending a night in your shelter is the only way to confirm it works. The builder’s overnight stay with his dog proves the cabin retains heat and provides genuine protection from the elements.
- Site Selection Matters: Level ground, good drainage, and wind-aware positioning are just as important as the build itself. Read the landscape before you start cutting.
- Thermal Mass Heating: Stone continues radiating heat after the fire goes out, making a well-built stone stove one of the most efficient heating methods for a small wilderness shelter.
Essential Gear for Log Cabin Shelter Building
Building a log cabin shelter requires reliable tools that can handle heavy work in the field. Here are the essentials for traditional bushcraft shelter construction:
- A quality bushcraft hand axe is your primary tool for felling, limbing, and notching logs. Look for one with a hardened steel head and a comfortable handle that can survive repeated heavy strikes.
- For splitting larger timber and driving through thick logs, a forestry felling axe provides the striking power you need for bigger jobs where a hand axe is not enough.
- A compact folding bushcraft saw handles precise cuts and cross-cuts on smaller timber, and it is easy to carry on any trip without adding significant weight.
- For the stone stove, a ferrocerium fire starter ensures reliable ignition in all weather conditions, even when tinder is damp and conditions are far from ideal.
- A wool blanket for cold weather adds critical warmth on your sleeping platform overnight. Wool retains insulating properties even when wet, making it superior to synthetic alternatives in damp wilderness conditions.
As an Amazon Associate, we earn from qualifying purchases.
Frequently Asked Questions
How long does it take to build a log cabin shelter in the wild?
With hand tools and a single builder, constructing a small log cabin shelter like the one shown in this video typically takes several days of dedicated work. The timeline depends on log availability, weather conditions, and the builder’s experience level. Experienced bushcrafters can complete a basic shelter in two to three days, while more refined builds with stone stoves and raised platforms may take longer.
What type of wood is best for building a log cabin shelter?
Coniferous trees like pine, spruce, and cedar are excellent choices for log cabin construction because they grow straight, are relatively lightweight when debarked, and have natural rot resistance. Cedar is particularly prized for its durability and insect-repelling properties. Avoid hardwoods for the main walls as they are heavier to work with, though they can be used for structural supports and the sleeping platform.
Can I build a log cabin shelter without any power tools?
Absolutely. Traditional log cabin construction was done entirely with hand tools for centuries. A hand axe, a folding saw, and a sturdy knife are sufficient for felling, notching, and finishing logs. The trade-off is time and physical effort, but the self-reliance and connection to the craft make it deeply rewarding.
How do I keep a log cabin shelter warm in extreme cold?
The combination of proper chinking, a stone stove for thermal mass heating, and an elevated sleeping platform with natural insulation is the key to staying warm. Chinking eliminates drafts, the stone stove radiates heat long after the fire dies, and the raised platform prevents conductive heat loss to the ground. Layering pine boughs or dry leaves on the sleeping platform adds further insulation.
What is saddle notching and why is it important?
Saddle notching is a technique where concave cuts are carved into the underside of each log so it seats snugly onto the log below it. This interlocking method locks the walls together, prevents shifting, and creates a tighter seal that reduces the need for chinking. It is one of the most important structural techniques in traditional log cabin construction.
Conclusion
Building a log cabin from massive logs is one of the most rewarding bushcraft projects you can undertake. It combines traditional woodworking skills with practical survival knowledge to create a shelter that keeps you warm and dry for days or even weeks at a time. The techniques shown in this video, from saddle notching and chinking to stone stove construction and elevated sleeping platforms, form a complete system for long-term wilderness shelter.
Practice these techniques before you need them, always carry the right tools, and test any shelter overnight before relying on it in a real emergency. A well-built cabin is more than a shelter. It is a home in the wilderness, built by your own hands from the forest around you.
Newsletter // article
Get the next breakdown
New video articles, gear notes from testing and tool updates — one email a week.
No spam. Unsubscribe any time. We never sell subscriber data.
Keep going // 3 more
Related reading

Surviving a Blizzard in a Self-Built Underground Cabin
A builder rides out a brutal arctic blizzard inside a self-built underground log-and-stone cabin. See why earth-bermed shelters beat tents in extreme cold.

What a Ranger Carries Every Day: Survival Gear Breakdown
A veteran ranger empties his pockets and explains the everyday carry survival gear he actually trusts daily: knife, fire starter, cordage, and first aid kit.

Surviving a Severe Snowstorm in an Abandoned Stone House
Watch a survival expert ride out a brutal blizzard inside an abandoned stone house, with winter shelter tactics for insulation, drafts, and safe heating.